Open your mind to a new realm of design
I spent most of my professional career as a scientist where linear thinking (“A” leads to “B” leads to “C,” etc.) was a way of life and strongly encouraged. Looking…
I spent most of my professional career as a scientist where linear thinking (“A” leads to “B” leads to “C,” etc.) was a way of life and strongly encouraged. Looking back, I’m sure this thought process is what drew me to woodworking; buy the wood, plane the wood, join the wood, finish the wood, etc.
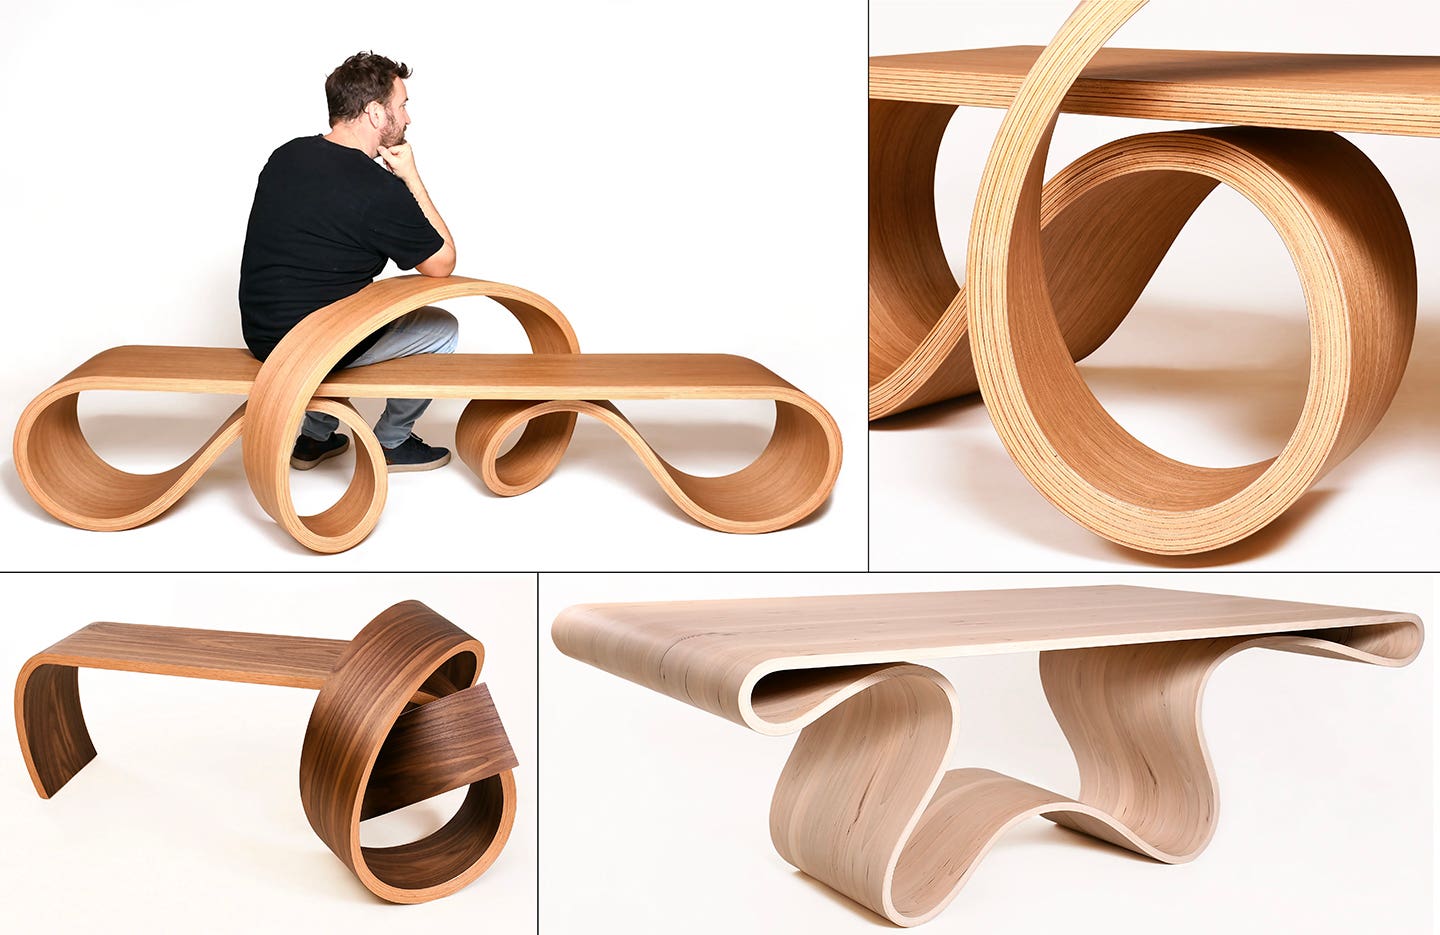
For years, this approach to the craft worked. But everything I built was, well, square. Perhaps rectilinear is more appropriate. But when all the votes were counted, the reality of pedestrian design wasn’t far from the truth. It wasn’t until I was mentored by Michael Fortune and Marc Adams that the lightbulb finally came on and I was able to see into the third dimension of furniture design and construction.
Obviously, by definition, any piece of furniture is three-dimensional but, in some sense, by sticking with square pieces we force a two-dimensional perspective into our work. Given the above, to advance my ability to design and build furniture, it became necessary to develop a different way of approaching the design process. What follows is the result of experiment and practice. It has helped me move my work into a new realm. I believe it can help many who struggle with the process of moving an idea to a plan and a plan to reality.
Concept
What is it I want to build? Many times this important question is not even asked because it appears to be painfully obvious. Some of us are so eager to start a project that we behave as if whatever it is we want to build will miraculously evolve from our efforts. If you employ this approach and actually end up with a finished project it will certainly be a compromise to what might have been. Your work can only be a reflection of what you have done in the past — not something new or challenging.
So here’s the point: ask yourself what you want. If it is a chair, does it have curved elements? Will it be an armed chair? Will it be upholstered? In addition, ask yourself if you are going to build a traditional or contemporary piece and will you be emulating someone else’s work? Or will it be a piece that expresses your particular voice? Once you have asked yourself all the simple and obvious questions, move to the next step.
Create doodles
I love Google SketchUp and other graphic design programs, but I encourage you to draw by hand. Drawing gives an organic connection with your work that is very difficult to achieve otherwise. In fact, I strongly encourage you to avoid the desire to make the drawings too pretty or neat. A focus on neatness will limit your creativity and drawings will start to look like everything you have already built.
Secondly, do not engineer the piece before you are done designing. Michael Fortune whispered this over my shoulder years ago while I was doing an apprenticeship. It made perfect sense because I was thinking about how to construct a joint while drawing and, of course, every joint became simplified and squarer in the process.
Doodling without regard to the engineering process frees the design to evolve. As a matter of fact, at this point you should not be concerned with dimensions or elements that might later limit the piece. There is plenty of time to figure these out later.
Make a scaled drawing
I find quarter-scale works well in most cases, but I’m not hung up on the point. Draw all appropriate views of the piece. Depending on the project, this can include a front, side and back view. This is the time to start working with issues such as height and width or the slope of the seat, but primarily you are interested in elemental relationships. This is where you want to see if the proportions are right and if the various components of the piece are coming together.
Again, avoid finalizing engineering issues and be prepared to make several drawings at this point. Most times it will feel like too much time is being spent here. But I can assure you every minute spent working on a decent scaled drawing will come back tenfold when you actually start building.
Create a model
There is a time when a plan must be moved from only two dimensions to three and a model is the easiest way to make this happen. I work with 1/4”-thick foam board and a low temperature glue gun to construct my models. If you have made a quarter-scale drawing, patterns for the model can be made directly from the drawing.
Now that you have truly moved into the third dimension, elemental relationships will become apparent in new and meaningful ways. For instance, balance and proportion cannot be fully appreciated in only two dimensions. Additionally, models allow one to see relationships between pieces of furniture intended to work together such as tables and chairs.
Warning: By now you will have become connected to your design and the normal reaction is to resist change. However, this is the time to get input from others and honestly step back to take a fresh look at what you are developing. While you have made a significant investment in time, you still haven’t committed lumber to a project.
Make a full-scale drawing
Assuming all design and function issues have been addressed, it is now time to make a full-scale drawing of your piece. One purpose of this step is to allow you to see the piece in its true size and relationship to its surroundings. In other words, set the drawing on the floor so you can see it as it will be in final form. Additionally, issues of mass and scale will continue to reveal themselves, requiring change. This is also the time to start thinking about the sizing of various components and the joinery that will be required.
One of the additional benefits of drawing in full scale is that joint angles rarely need to be measured. They can simply be taken from the drawing with a bevel gauge and transferred to the appropriate tool.
You can draw successfully on paper, but I actually prefer drawing on 1/4”-thick plywood. My eraser is a random orbit sander so, for me, paper doesn’t hold up well.
Make a full-scale model
Complicated pieces require that you go to the effort of full-scale models. They can be made from secondary wood and many parts can come from your scrap bin, but chairs, for instance, need to be sat upon and any moving parts need to be fully functional.
Rough sizes of component pieces can easily be determined and decisions such as steam bending or laminates are facilitated by being able to observe your design as it will appear when complete. Joint issues and fixture requirements are also resolved by working through the model. As always, continue to get input and carefully study your project. It’s still easier to make changes now than to live with compromises that will be apparent every time you look at or use your creation.
Parting shot
Finally, there is no magic here and I have not given you a process that will prevent poor design from showing up in finished work. What I have given you are six simple steps that, if executed faithfully, will help you maximize your creativity. By not engineering too quickly, you will solve problems at the appropriate time and enhance your skills at working in the third dimension.
Keith Neer is the principal of Clermont Woodworking and Design Inc. To view his work, visit www.clermontwoodworking.com.
This article originally appeared in the March 2012 issue.